DOWNLOAD FREE GUIDE

HOW TO BUILD THE PERFECT RISK COCKPIT FOR MICROSOFT AD

In this guide, we bundled the identity controls that apply to Active Directory. Moreover, this set of controls has proven to be applicable to the majority of the organisations.

[SMART MOCKUP] [GUIDES] [How To Build The  Perfect Risk Cockpit for Microsoft Active Directory]

✔️ What is a risk cockpit? 

✔️ Why using the NIST-framework?

✔️ Why should we focus on Active Directory?

✔️ The 6 essential steps to build a risk cockpit

WHAT TO EXPECT

💡Additional information and insights

👉 Tips & tricks

💻 Screenshots and explanation about Elimity Insights

INTRODUCTION

Table of Content

  1. Conventions & Introductions

  2. Why do you need a risk cockpit in the first place? 

  3. Building a risk cockpit based on the NIST framework

  4. Why focus on Active Directory

  5. 6 steps to set up & 8 building blocks of a solid AD risk cockpit

  6. Conclusion & Epilogue: Elimity Insights for Active Directory

Introduction

In a business and IT context, there’s only one constant: change. Think of hybrid IT landscapes that keep on evolving, tens or even hundreds of systems and applications that need updates on a regular base, a growing number of temporary contractors such as freelancers and consultants, etc.


Considering this pace of change, maintaining an overview of the situation has become more challenging than ever. But if you can’t see all the users across your IT environment and if you don’t know what applications and data each of those users can access, it is close to impossible to control risks and prevent threats. Understanding the relationships between people, access and data is a crucial factor in this regard. In other words: getting to know the unknowns.


In this guide, we bundled the identity controls that apply to Active Directory. Moreover, this set of controls has proven to be applicable to the majority of the organisations. In the ebook ‘How to build the perfect risk cockpit for Microsoft Active Directory’ we discussed the six steps to set up comprehensive and scalable risk cockpit.

This guide is written for IAM, IT and security professionals. The contents are not limited to any organizational size, structure or industry. The premise is, however, that the organization uses Active Directory. Nevertheless, most of the controls also apply to other applications albeit with some adjustments.


WHY DO YOU NEED A RISK COCKPIT IN THE FIRST PLACE

1. GET BACK IN THE DRIVER'S SEAT

Employees use more and more applications, of which a growing number is cloud-based. Besides, hybrid environments are becoming the new standard. Maintaining an overview of who can access which application therefore becomes increasingly difficult. And increasingly important as well. Think of security breaches, compromised data, all of the regulations your organization needs to comply with, … Using a well-designed risk cockpit, you can easily assess and audit access to your critical applications, gain actionable insights, and control the users and their access rights.

2. EMPOWER YOUR IT TEAM

In many organizations information security audits and other identity controls are still based on the use of spreadsheets. However, this method is very time-consuming and cumbersome, and often leads to inaccurate results, and therefore in wrong decisions. Moreover, the relations between people, access and data are often hard to spot in non-dedicated identity tools such as Excel. 

3. GAIN ACCESS CONTROL

Today, many employees don’t simply climb the ladder within a single department. Instead, they regularly switch across departments and functions. If you sit back and relax, access rights and permissions will inevitably pile up and users will end up with excessive access rights they no longer need to do their job. These excessive access rights pose a risk to the organization as they can be misused or compromised. 

In summary, a comprehensive risk cockpit allows your IT team to easily detect and reduce risks. Moreover, passing your next internal or external audit will happen much smoother and faster. 

BUILDING A RISK COCKPIT BASED ON THE NIST FRAMEWORK

The NIST CSF is not the only ‘framework’ implying that the implementation of IT security will be - slightly - different for each company (see additional info on the right). Think for example about the standard ISO 27001 that also leaves room for interpretation and meaning of processes and controls. This is reflected in the step by step approach shown on the next page. Following these six steps will enable you to set up an identity & access risk cockpit that is aligned with the IT and business strategy of your organisation. This approach can be used to design a comprehensive risk cockpit for any important application or system in your organization. Ideally, you even have a single risk cockpit that gives you complete visibility into all users and their access rights across all important applications in your organization. In this ebook, however, we will focus on building a risk cockpit for Microsoft Active Directory.

NIST CSF 💡

WHAT IS NIST?

The NIST Cybersecurity Framework (CSF) is developed by the National Institute of Standards and Technology (part of the U.S. Department of Commerce) in order to help companies identify, assess and manage cyber risks. However, this Framework is not a one-size-fits-all approach that can be copied word for word and applied to each company. That is because organizations often face unique cyber and information security risks. The trick is to identify the relevant pieces, customizing them to your business needs and implementing them within your organization.
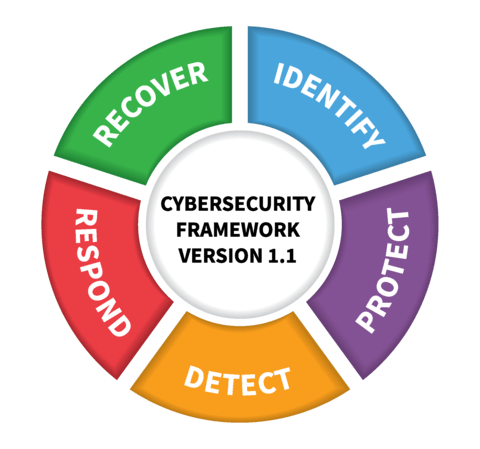


STEP 1: IDENTITY THREATS AND REGULATIONS

“What regulations must your company comply with and which threats could jeopardize the security of business critical data?”

Regulations concerning information security are primarily developed to protect employees and customers against the misuse of their personal (and sensitive) data, such as GDPR and CCPA. In doing so, those regulations force companies to take certain measures to protect themselves and to protect the data they keep from potential threats. The threats that could jeopardize the security of your sensitive and business critical data play an important role in this. 

For many organizations, striving for compliance with relevant regulations is an important driver to implement or improve their security processes and controls. While this is of course a valid and very useful reason, there are companies out there that also use these regulations as the basis for their security program because they consider this good business management. In fact, more and more stakeholders attach importance to organizations using the data entrusted to them in a sensible and responsible matter.

Understanding the business and regulatory context you are operating in allows you to align your risk management strategy with your business needs and set the right priorities. Moreover, this is a prerequisite to design and build an appropriate risk cockpit. Note that, next to the purely objective aspects (such as regulations imposed by a governmental body), it’s also about the issues that you and your team are concerned about. What’s in your head all day and what keeps you awake at night? 

Fact is that the success of your security efforts greatly depends on your ability to focus energy where it really matters.

STEP 2: REFLECT ON CRITICAL OBJECTS

What are the most critical - and therefore vulnerable - AD objects in your organization?”

Before setting up the relevant control sets, it’s important to know which groups, and therefore which user accounts, are critical for the mission and security of your organization. Nowadays it’s common practice to use standard rules to give you an indication of these groups. Those rules are often based on the use of AD default security groups, such as Administrators, Domain Admins and Enterprise Admins. However, those groups do not take your business context into account, nor your organizational and AD structure (e.g. custom groups). Nevertheless, those standard rules are a good starting point. 

Once these ‘default critical’ groups are identified, you should evaluate whether they are actually critical and actively used in your organisation. Additionally, identify custom groups (if you have any) and check - keeping the business and regulatory context in mind - which  groups  are critical or riskier than others.

In the section about privileged accounts you can find some elements you should definitely look into.

In order to properly execute this step, gaining full visibility and understanding across all groups and other AD objects is essential. If you don’t know how to get started, don’t hesitate to contact us and get some more detailed instructions.

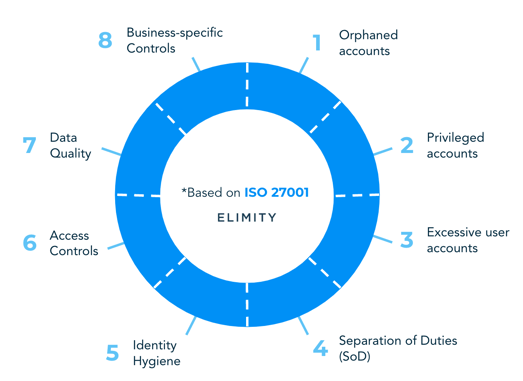
STEP 3: DETERMINE CONTROL SETS

“Which security control sets do you need in your risk cockpit

You can improve the overall security health of your AD by identifying, analyzing and responding to risks and potential threats. 

The ISO 27001 based identity wheel (see figure on the right) shows eight control sets that are applicable for the majority of modern organizations. Each of these control sets ideally entails several specific controls. Within ‘orphaned accounts’, identifying users that have not logged in for some time is such a specific control. 

In our AD controls guide we bundled a comprehensive collection of controls within each control set, which has proven to be useful for the majority of organizations.

Screenshot 2022-12-19 at 16.56.45

STEP 4: ANALYZE

What is the current AD risk posture?”

Before you start analyzing the security control sets we discussed before, it’s recommended to look at the current identity repository size to know what’s out there. Some metrics to look at: 

  • The number of user accounts
  • The number of groups
  • The number of computers
  • The number of managers

Once you have a general overview of the size of your AD, you can start with analyzing the security controls. As said in the introduction, it’s about getting to know the unknowns. Find out how many orphaned accounts there are, which accounts are privileged, ... Once you’ve done that, assess the results of the security controls by indicating the corresponding risk level (see on the next page). This will help you to prioritize your efforts in the next step. 


Note that specific user accounts or groups within a control can be riskier than others. Take for example the orphaned accounts control set. If it turns out that both an admin user account and a non-admin user account have been inactive for some time, the orphaned admin user account entails the most risks. This is because it allows hackers to abuse more organization resources and data if they get in. 

Once you have determined the right risk levels for each security control it’s important to document the main findings, so you can use them to support decision-making in the next step

STEP 5: FOCUS AND TRANSFORMATION

Where should you start, and which issues should you tackle first?”

Based on the results and the indicated risk levels that were determined in the previous steps, you can now set up a roadmap (that contains several control projects) to secure your AD environment and gain more control.

It is of course recommended to include control projects that contain pressing issues early in the roadmap. In the figure on the right you can see how effort and risk reduction are often interrelated, and how a control project fits in.

Once the roadmap is started and you’re gaining control over your AD environment, you should track progress, so you can measure anytime whether you’re still on track. This allows you to report on the current situation to your manager and other stakeholders. Note that you need actionable insights for each project (however small it is), so you know who to address. For example: which manager needs to review whether a certain empty group may or may not be removed.

NIST CSF 💡

RISK REDUCTION vs EFFORT

Screenshot 2022-12-19 at 17.05.52

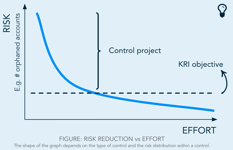
An AD control project can often be seen as a clean up project whereby incorrect access rights or inactive user accounts are remediated or mitigated. A certain control project can be considered finished when the KRI objective has been achieved.

STEP 6: FOLLOW-UP

Monitor the situation, follow-up over time and respond proactively.”

It’s not because a control set is under control now, that it will remain so in the future, especially if no further action is taken. People join and leave the company and move across departments all the time. Furthermore, companies might go through mergers, acquisitions, etc. 

This means that you have to keep on monitoring these controls and react promptly when any relevant changes occur. This way, you can better manage information security risks and prevent threats. 

Moreover, the regulatory landscape is continuously changing. Keep your eyes open for changes, so you can anticipate and take proactive actions right away such as including an additional control.

STEP 2: REFLECT ON CRITICAL OBJECTS

What are the most critical - and therefore vulnerable - AD objects in your organization?”

Before setting up the relevant control sets, it’s important to know which groups, and therefore which user accounts, are critical for the mission and security of your organization. Nowadays it’s common practice to use standard rules to give you an indication of these groups. Those rules are often based on the use of AD default security groups, such as Administrators, Domain Admins and Enterprise Admins. However, those groups do not take your business context into account, nor your organizational and AD structure (e.g. custom groups). Nevertheless, those standard rules are a good starting point. 

Once these ‘default critical’ groups are identified, you should evaluate whether they are actually critical and actively used in your organisation. Additionally, identify custom groups (if you have any) and check - keeping the business and regulatory context in mind - which  groups  are critical or riskier than others.

In the section about privileged accounts you can find some elements you should definitely look into.

In order to properly execute this step, gaining full visibility and understanding across all groups and other AD objects is essential. If you don’t know how to get started, don’t hesitate to contact us and get some more detailed instructions.

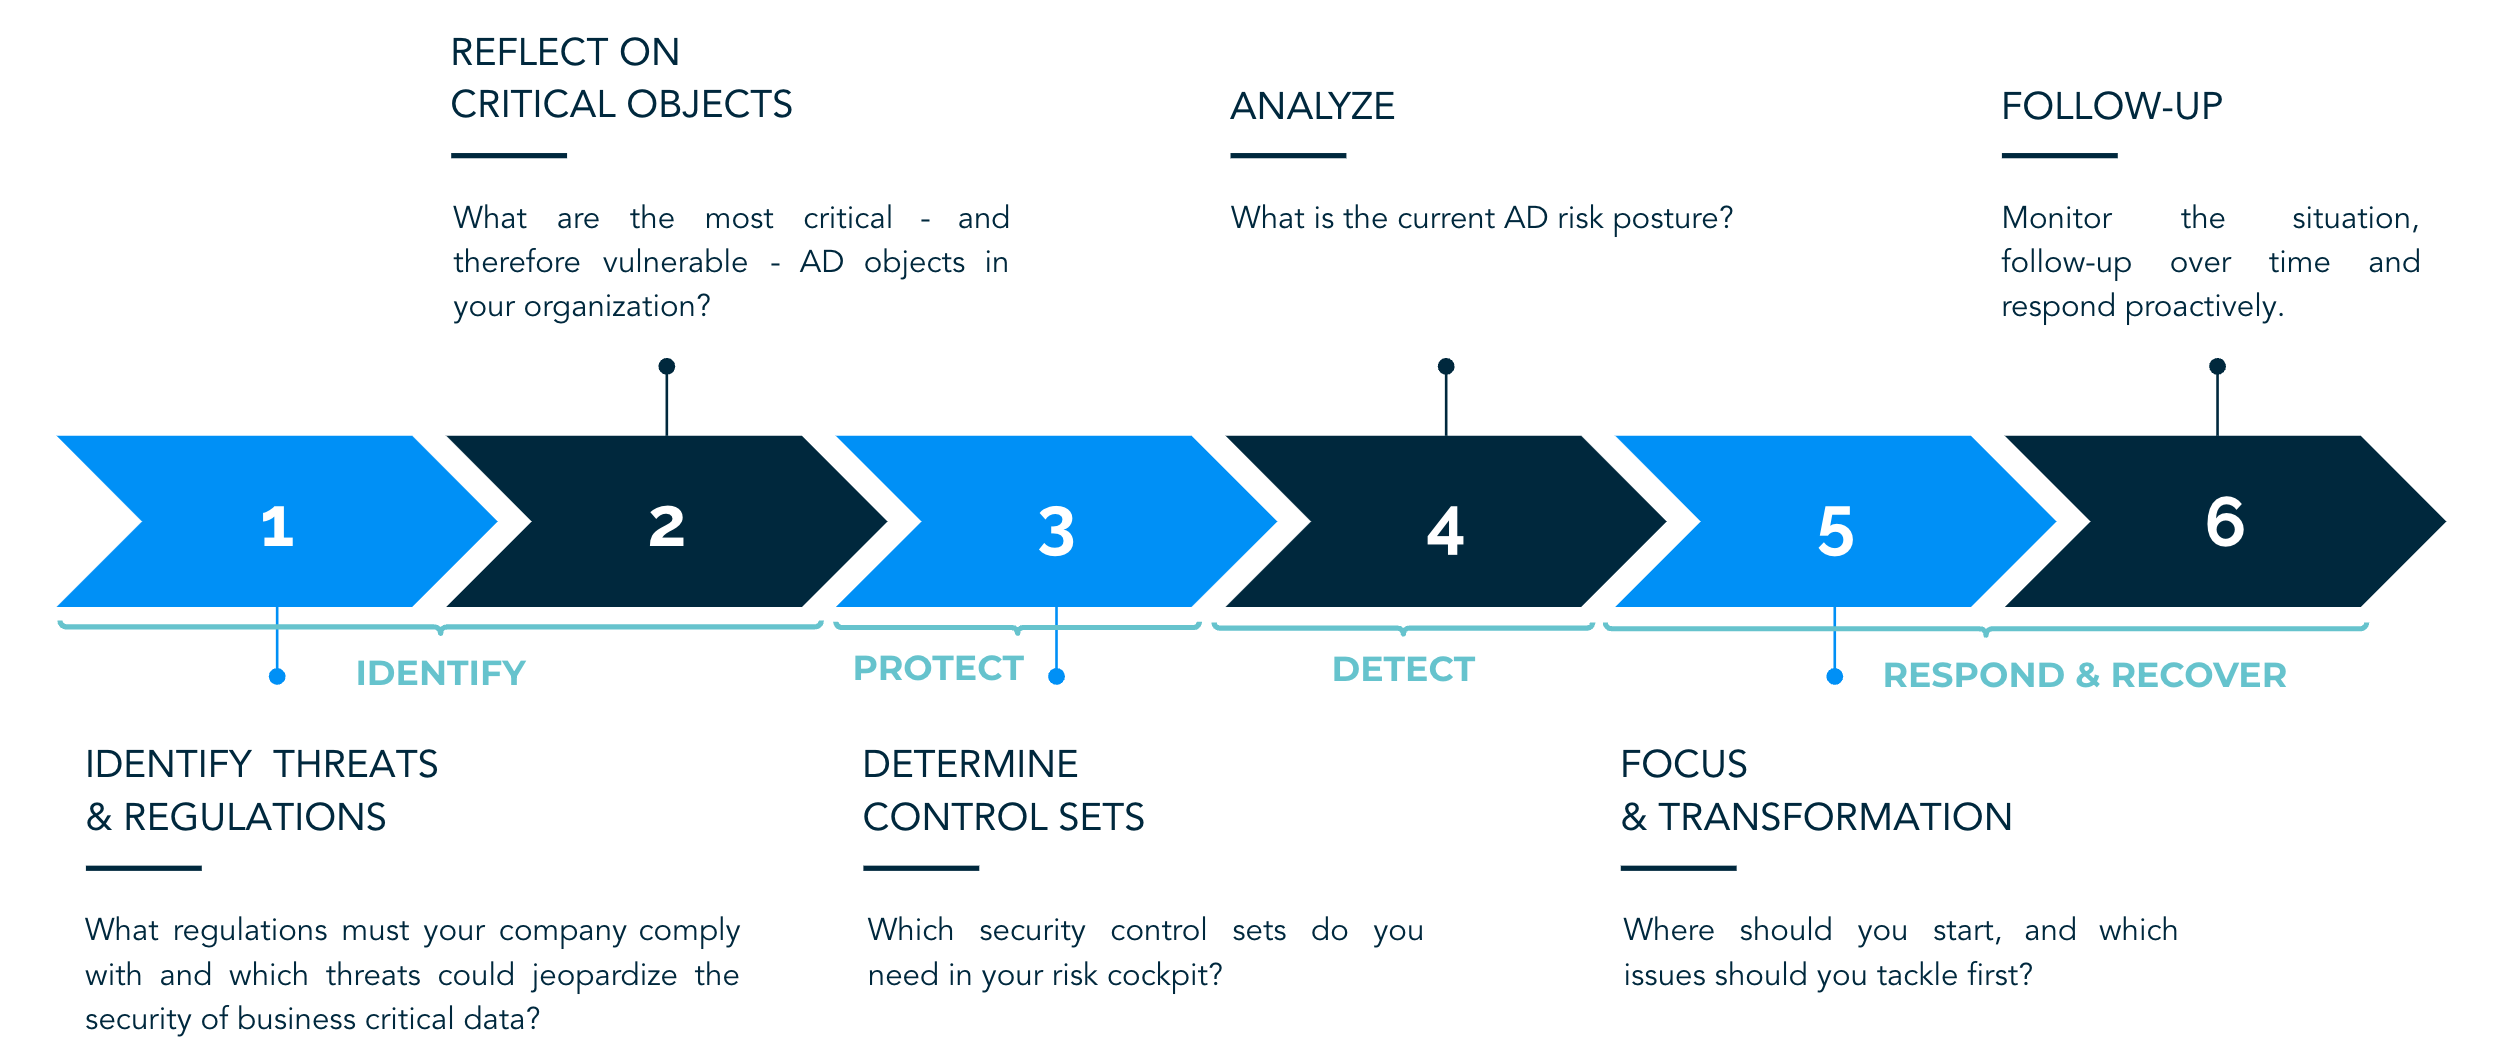
STEP-BY-STEP GUIDE TO SET UP THE IDEAL RISK COCKPIT

Screenshot 2022-12-19 at 16.21.15


RISK MATRIX

RISK ANALYSIS 

It is not obvious to define the right priorities and risk levels. Several frameworks are available that can guide you through this process. A frequently used approach (see Risk Matrix below) uses both likelihood and impact. 

First you have to reflect on how likely it is that hackers or malicious insiders will misuse a specific weakness. Next, you should check how big the impact would be. Both questions should be scaled (see the axes on the Risk Matrix), and the resulting risk level can be found as the product of both likelihood and impact.
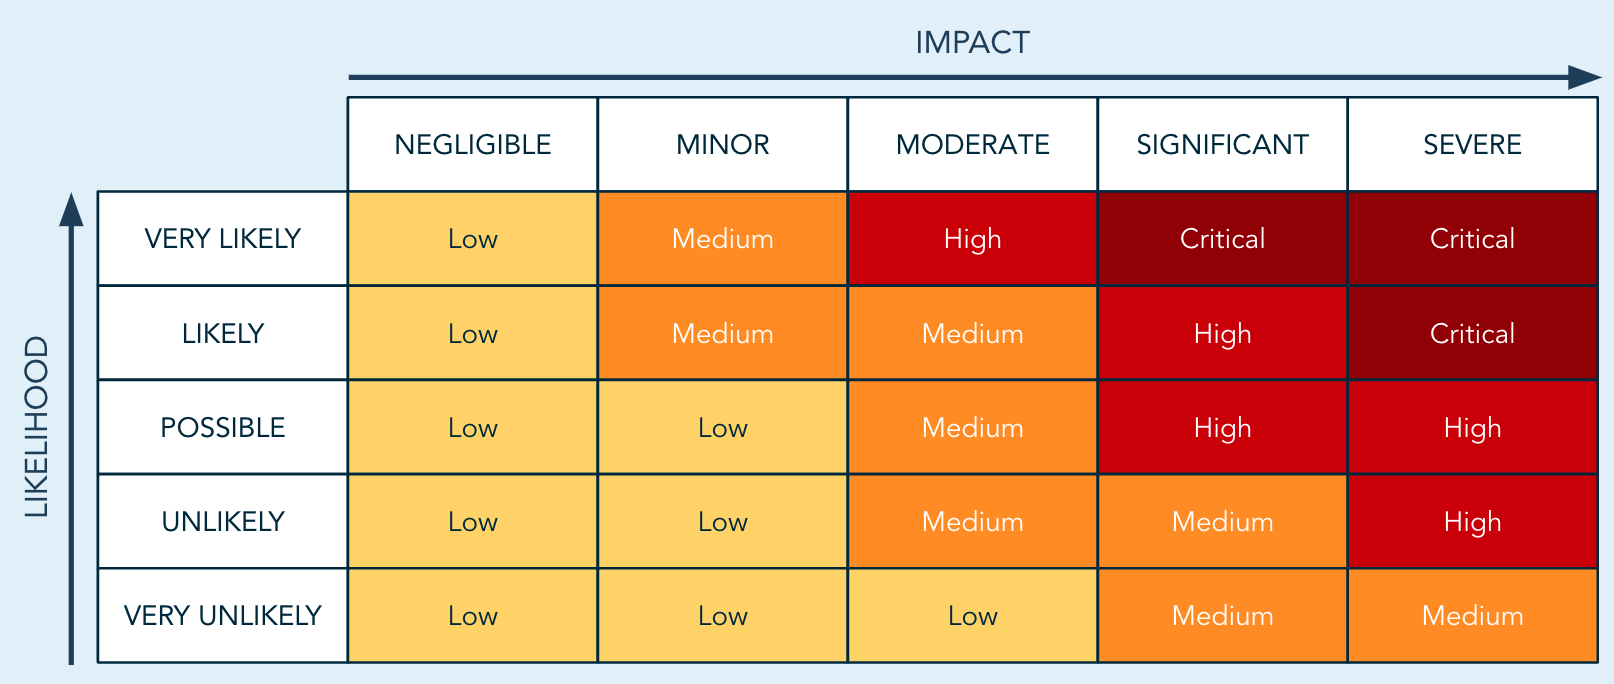
Screenshot 2022-12-19 at 16.33.21 FIGURE: RISK MATRIX

Control Sets

You can improve the overall security health of your Active Directory by identifying, analyzing and responding to risks and potential threats. On the following pages, we provide you a comprehensive collection of controls, which has proven to be useful for the majority of organizations. Each of those control sets includes several specific security controls. You can extend or limit this set of controls according to the security standards you want to comply with and to the business-specific context you are working in.


The ISO 27001 based identity wheel (see on the right) shows eight control sets that are applicable for the majority of modern organizations. On the following pages, these control sets are explained in more detail.


Screenshot 2022-12-05 at 11.19.05
Screenshot 2022-12-05 at 14.03.58

1. Orphaned Accounts AD

Would you ever leave for a vacation and leave your front door unlocked? Or lock it but leave the keys scattered around the yard? Of course you wouldn’t. Still, this is equivalent to what organizations do when they leave orphaned accounts hanging around. Much like robbers, hackers or disgruntled (ex)-employees look for the easiest and quietest way in. One such path is through user and service accounts that are no longer actively used. From a hacker’s perspective, it’s relatively easy to find these accounts: a quick search on LinkedIn could reveal who’s recently left the company. This applies to both employees leaving and external contractors who finished a project in your organization. Organizations that fail to take the necessary steps to close these entry points leave the door on a jar for attackers. This way, hackers could compromise an account with access to security systems or access to sensitive information like intellectual property (IP), personally identifiable information (PII) or financial documentation.


When an employee leaves the organization or when a contractor’s project has ended, their user accounts must be deactivated without further delay. This should be part of the typical offboarding procedure of both employees and contractors.


However, in practice, those user accounts are often not correctly deactivated, or even not deactivated at all. Within AD there are two ways to detect those accounts:


  • Spot user accounts - e.g. by using a search function - that have not been used for a certain period of time (also known as dormant accounts). In other words, users that have not logged in for some time. 90 days is often considered the limit but depending on your business context and the appeal your organization has on hackers, that period can be shortened or extended.


  • In AD, user accounts can be given an expiration date when they are created. However, those accounts are not automatically disabled on the expiration date. As a result, these accounts are often forgotten, but can still be misused for malicious practices. It is therefore strongly recommended to make a list of all expired accounts. Likewise, a list should be made with all accounts that are about to expire in the coming weeks or months. Next, review the lists to decide which of the accounts must be extended or disabled. It’s also possible to create a user account in AD without an expiration date, but it’s advisable to do so as little as possible and evaluate those accounts regularly. PRIVILEGED ACCOUNTS // PG 7 The best practice to get rid of orphaned accounts – disabling or deleting – can vary between companies. In many organizations, disabling the accounts is the standard. That is because this method leaves all the traces around the account intact, which can be very useful for audits.
DOWNLOAD AD RISK COCKPIT GUIDE

💡 Roadmap for a risk cockpit

Based on our experience, we have designed a six steps framework to build a comprehensive risk cockpit for Active Directory.
 
We can help you fill in this document, offer you the complete solution or help you improve the current situation. You can contact us at hello@elimity.com or find out more on www.elimity.com.
 
DOWNLOAD DATASHEET